
Linux Mint is very popular and widely used by users around the world. In this article, we will guide you with step by step process to Install Linux Mint 16 in Dual Boot with Windows 10. This setup will allow you to run both Windows and Linux Mint on the same computer, giving you the best of both worlds.
Requirements
Before you start the installation process, it is important to make sure that you have all the necessary requirements listed below. The following are the minimum requirements for installing Linux Mint 16:
- Computer with a 64-bit processor
- Minimum of 4 GB RAM
- Minimum of 20 GB of hard disk space
- The Linux Mint 16 installation disc or USB media
1) Backing up Data
Before you start the installation process, it is recommended to backup all your important files. This is to ensure that your data is safe in case anything goes wrong during the installation process. (on external hard drive, cloud storage, or any other device etc).
2) Download Linux Mint
There are several versions of Linux Mint available. The default is Cinnamon. If your computer supports 64 bit, go with 64 bit Linux Mint 19.3 Cinnamon. If you know about other desktop environments, you can choose whichever Mint version you want.
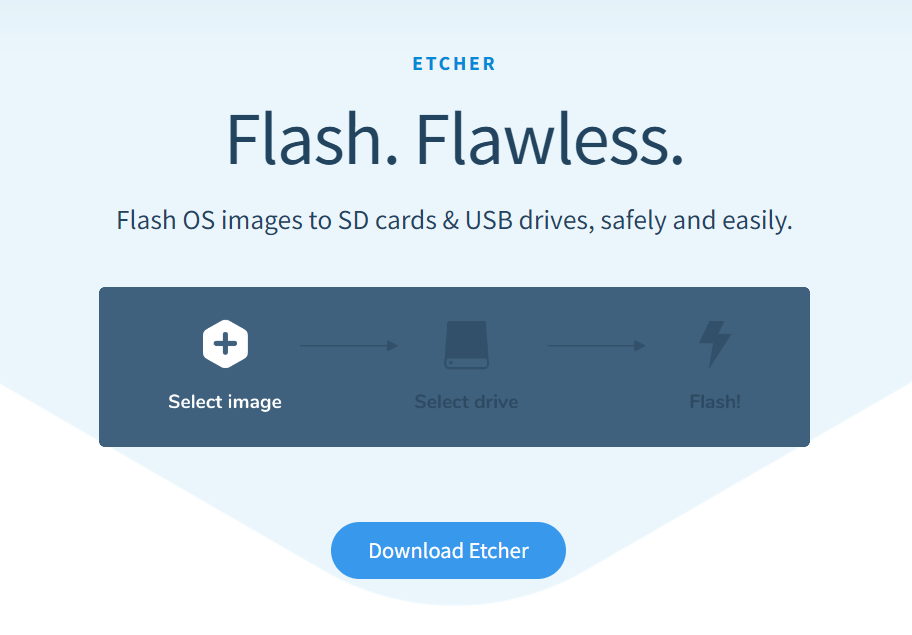
3) Creating a Bootable USB Drive
In order to install Linux Mint 16, you need to create a bootable USB drive. You can use the balena Etcher to create the bootable drive. Simply follow the instructions on the screen to create the bootable drive.
4) Make a new partition for Linux Mint
Option -1 : If you have un allocated space on your disc.
Step 1: Open Disk Management
- Press Windows Key + X and select “Disk Management”.
- Locate the hard drive where you want to create the new partition and right-click on the unallocated space.
- Select “New Simple Volume”.
Step 2: Create New Partition
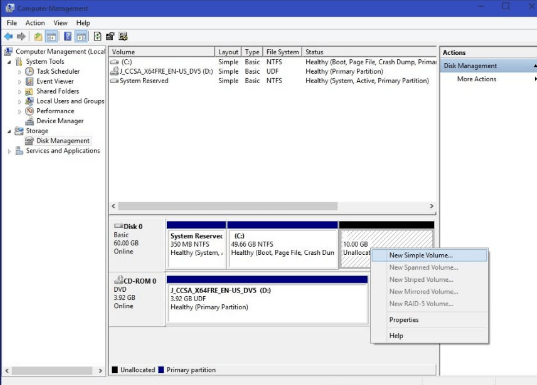
- In the “New Simple Volume Wizard”, click “Next”.
- Enter the size of the partition in MB. This should be at least 20 GB.
- Select the “Primary” partition option and click “Next”.
- Assign a drive letter to the partition and click “Next”.
- Format the partition as “NTFS” and give it a label, such as “Linux Mint”.
- Click “Finish”.
Option -2 : If you have enough free space on one partition of disc.
Your existing data will be safe if you have enough free space. Normally we install Linux in under 10 Gb, however, if disk space if not a concern, using 30-40Gb at least is advised. This way you can have more space for downloading and keeping various files.
In Windows 10, go to start menu and type ‘partition’. This will bring up Disk Management utility. Now carefully select the disk in which you’ll make some free space by shrinking the volume:

Now will get the required free space on your disc to create a new volume for Linux as explained in Option-1
5) Setting up the Dual Boot
- Restart your computer and boot from the Linux Mint 16 installation disc or USB drive.
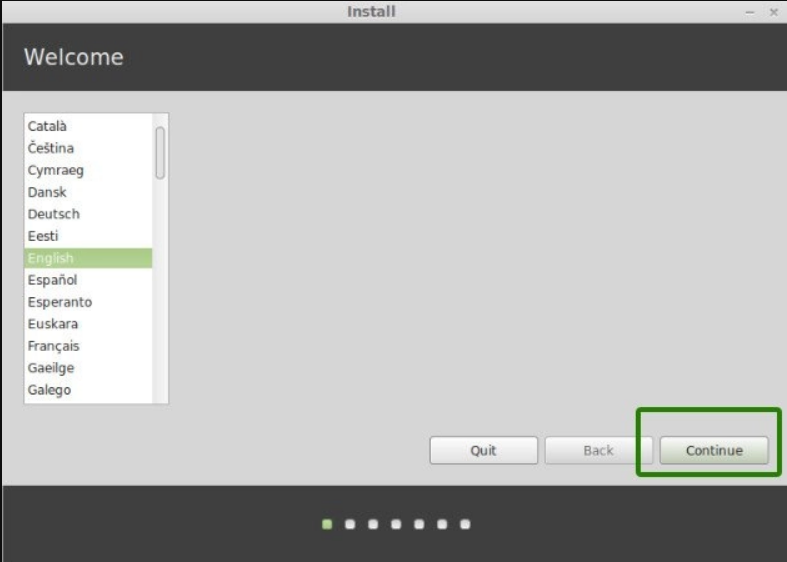
- Select the language, time and currency format, and keyboard input method.
- Click on “Install Linux Mint”.
- Select the “Install alongside Windows” option.
- Linux Mint will now automatically partition the hard disk and install itself.
- You can also use manual selection of partition and give required inputs.
6) Conclusion
In this article, we have shown you the simple method of how to install Linux Mint 16 in dual boot with Windows 10. This setup will allow you to run both Windows and Linux Mint on the same computer, With this you can choose which operating system to use when you start your computer.
Read more articles on https://softechonline.in/